Pages

July 28, 2011

You asked for it: Peach Muffins!

Total truth: this is not my picture, although I wish it was! Thank you, interwebs! (My focus was on EATING the muffins, not photographing them!)


We took a trip to the farmer's market after church recently and loaded up on eggs, squash, dog biscuits, handmade ravioli, and PEACHES! I knew I would be using them in something like a cake or muffin.  I found a recipe I had copied and pasted from some website months and months ago (sorry I can't give credit where credit is due...) and knew it was the perfect time to try it!

The original recipe was "cobblerish" because people were adding a sugar/crumble topping.  I tend to not do this kind of topping on our muffins because I usually make them on the weekend and throw them in a freezer bag for us to grab and heat up for quick breakfasts, and I've found that sometime the topping doesn't hold up well (or just falls off in the bag).  But if you're making this and eating it right away, feel free to do something on top. I just know when I mentioned on facebook that I was making Peach Cobbler Muffins that people got very excited, so I wanted you to know how they became just peach muffins.  They're still delicious :)

Here's what I used and what I did.  Feel free to customize! I do several things to "healthify" our muffins, so you may not like using the subsitutions I do.  We've gotten used to our muffins being mostly whole wheat and not as sweet, but that may not be your thing... I usually mix in some ground flax seed to up the nutrional value and make them more filling, but I was out this time around.


Peach Muffins
  • 3 cups flour (I used 2 cups whole wheat and 1 cup all purpose flour)
  • 1 tablespoon ground cinnamon
  • 1 teapsoon baking soda
  • 1 teaspon salt
  • 1 cup unsweetened applesauce and 1/4 cup vegetable oil (or just 1 1/4 cup oil; I almost always use applesauce in place of oil in muffin/bread recipes)
  • 3 eggs
  • splash of vanilla extract
  • 1 1/2-2 cups sugar (I used 1 1/2 cups and they were plenty sweet. I may try using some brown sugar next time)
  • 2 cups chopped peaches (Feel free to use frozen or canned, the fresh peaches were just too delicious. I ended up using 2 large peaches, but may do 3 next time)
  • handful of chopped pecans (this wasn't in the original recipe, but why NOT add pecans???

1. Preheat oven to 400 and grease your muffin pan.  I made 12 large muffins from this recipe.

2. In a large bowl, combine all of the dry ingredients, including the chopped pecans.

3. In a smaller bowl mix eggs, oil, vanilla, and sugar.

4.  Stir the wet mixture into the dry mixture just until combined. Fold in peaches. If your batter seems too thick, just add a little milk.

5.  Fill up your muffin pan (and add topping, if you want) and bake for about 25 minutes or until a toothpick inserted into the muffin comes out clean.  Let muffins cool for a bit and then serve.

6. Come back and leave me a comment letting me know if you liked them!


We both liked these and I will probably make them again the next time I have some fresh peaches that need to be used.  The ones I made were really filling because of the whole wheat flour and they were sweet but not too sweet. They were a nice change of pace from the muffins I've been making a lot recently (peanut butter banance muffins, raisin bran muffins, and strawberry-banana muffins).

And as an additional, unrelated note of goodness... look at the pretties growing in my front yard! I love this athena plant (a peony hybrid) and it's constantly showing new blooms.  I know my neighbor thinks I'm crazy when I walk into the flower bed and take pictures, but oh well! Happy Thursday!


The Shabby Nest


Boogieboard Cottage


Photobucket

July 26, 2011

Housewarming Gift


I'm one of those lucky few who get to say that they had AMAZING college roommates, and we still love each other and keep in touch. We don't get to see each other as much as we'd like because our lives have taken us in a lot of different directions, but I love those crazy girls.


My sweet (and frugal and sickeningly cute) friend, Caitie, and her husband Lance recently bought their first house in Asheville, NC and I could not be happier for them.  I decided that I wanted to make her a little sumpin sumpin to welcome her to her new place.  Painted fabric napkins! This particular project was great for several reasons:

1. I got to try out a new painting  technique that I will no doubt use a lot now.
2. It's something she'll use a lot...and therefore think of her dear friend Dana often!
3. Soon after Adam and I got married I realized that it was time to figure out a way to stop wasting so much money on paper towels.  Although I can get them for fairly cheap with coupons, I can get very dependent on paper towels and use way too many.  Plus, I don't like spending money on stuff that ends up in the trash. So I started scouring thrift stores and clearance racks for fabric napkins.  I have a basket full of them in our laundry room, and a bag where I put dirty ones.  Whenever I have room in a load of dirty laundry, I throw some of the dirty napkins in. I've found that a roll of paper towels will last us several weeks now, and BONUS- guests think we're being fancy with our napkins, when in reality I'm just cheap. I wanted to get Caitie started on her collection!
4. Caitie's probably so busy ripping down decades-old floral wallpaper that she won't even have time to get online, thus this post will not ruin the surprise :)

I saw the process here at the thrifty crafter, and it was fairly easy.  If I were to offer any advice to someone wanting to screenprint using this method, it would be to choose a fairly simple shape/design that uses more straight lines than curved one.  Like, seriously, do a square. Or a triangle.  For the record, I'm more likely to do some monogram napkins for friends whose last name is Lemmons than Smith.  That curvy "S" makes me nervous! haha.  Alright, here's the scoop:

1. Gather your materials!


You'll need:
  • plain fabric napkins
  • sponge brush to apply paint
  • permanent fabric paint
  • exacto knife
  • tape (optional, for holding paper to napkin; I didn't do this step... I'm a cheater!)
  • freezer paper
  • stencils
2. Turn on The Bachelorette.  Crafts are more fun with something to make fun of in the background.

3. Use a pencil and stencil to draw your chosen design on the freezer paper.  Draw on the matte side of the freezer paper, shiny side down.


4. Use the exacto knife to cut out the design.  This is where you'll get the whole "choose a simple design" tip from earlier. I did find that it was easier to cut from one point to another point, and then when the direction changed, I left the exacto knife at the same spot and just turned the paper.  This meant my knife was going the same direction the entire time.  Does that even make sense?? Make sure you go slow with this and don't make any extra cuts outside of the design because paint will leak through onto your fabric.  Sad day.


5. Iron the freezer paper onto your napkin, wherever you'd like your design to be.  Iron until all edges are sealed.  I didn't use the steam setting...didn't think that would work out too well.


You can be more responsible and do this on an ironing board or something. 


6. Use your sponge to apply paint within your now-applied paper stencil.


Now, I'm sure you guys are following along very well and I have total confidence in you that you can do this.  For me personally, I need a supervisor for most of my projects.  He gives little input but watches carefully and occassionally does some quality assurance.  He was pretty laid back this time around.  I guess napkins aren't his thing.


7. Do as I say and not as I do and get up and do other things around the house while the paint dries.  I worked on the other napkins for the set, and as I finished one I peeled the paper off the last one I made.  The paint dries pretty quick, but you should probably be safe and just let it dry thoroughly. Once you peel off the paper you'll have some pretty instant gratification...

Not perfect, but who wants a homemade gift without some of that homemade character?

**Once the paint is really dry, put a sheet/towels over the painted part and run your iron over it for a while.  This makes the paint permanent.**

And here's the whole set, ready to be mailed to my sweet, homeowning friend! (I really hope she likes the designs I chose.  My set of stencils didn't come with Care Bear, butterfly, or daisy shapes, so I had to go with what I had. hahaha)


And this, my friends is how you can do some fun personalized gifts or home decor for the holidays on the CHEAP! You can find plain t-shirts, napkins, towels, table runners/clothes and then doctor them up with whatever design you choose! Some monogrammed napkins would be great for a newlywed, and I have plans of doing simple seasonal shapes to make things to jazz up our home for the holidays (a light blue napkin with a white snowflake would be so cute in my kitchen!). 

Have fun!


Boogieboard Cottage


Photobucket

Join  us Saturdays at tatertotsandjello.com for the weekend wrap 
 up           party!


Strut Your Stuff Saturday

Delicately Constructed Friday


The Shabby Nest

July 24, 2011

DIY Vase Filler

**Edit 7/28/11: Thanks to The DIY Showoff for highlighting this project! :) :)
The DIY Show Off


First of all, today's post is dedicated to my sweet life-long friend, Rachel Kavanagh because today is her birthday! Having friends live so far away is no good, but having friends that you can always pick right back up where you left off is great, and she is for sure one of those friends.  Love you, Rachel Holiday Inn! SLVRM! :) :)


Sweet Rachel (and Baby Clare!) on my wedding day. She made pregnant look GOOD!


And now for the crafty craft...

I know you've seen the decorative vase fillers in the home decor section of lots of stores, and you've likely noticed that they can be ex-pens-ive.  I have lots of vases and hurricanes stored away to decorate with, but some of them are really too big for your average flower arrangement so I needed some decorative filler and did not want to buy it if I could make it! And I can! Plus, I have the cutest blue bowl sitting on my kitchen table just waiting to be filled with loveliness.

I got the idea from Landee See, Landee Do and knew it was a simple project I could take on while catching up on my DVR recordings. All you'll need is:


  • styrofoam balls (make sure they're not dented because the thumbtacks won't line up right). You can see in the picture above that the first ball I used was one of the green floral balls.  If you can find the harder, white styrofoam, use it.  The thumbtacks stick better.
  • thumbtacks. I originally bought packs of 70 at Suck-Mart and then realized I could pay the same amount and get 300 at Dollar Tree. You do the math. You're going to need wwaayyy more thumbtacks than you think you need, but at least they're cheap!
  • spray paint (optional)
Insert the thumbtacks into the ball, overlapping a bit as you go.  I started with a circle around the middle and then worked my way up.


At this point I has used 280 thumbtacks, but it only took maybe 10-15 minutes. 

Just keeping doing this until you've got the ball covered AND you never want to see another thumbtack again.  I covered one large and two smaller ball (the smaller two are the white styrofoam and the thumbtacks stay in MUCH better).


I used a combination of silver and gold thumbtacks, because that's what they had at my Dollar Tree.  I really liked the look of the metallic surface, but in some spots you could see the styrofoam and I just couldn't deal with it. I want it all the same color! So... spray paint.  Here are my new little cuties painted in ivory.  I wish the paint was glossy, but oh well! They don't quite fit in the pretty blue bowl I had envisioned them in, but you get the idea :)


Pretty cute addition to the kitchen table!


The DIY Show Off

Photobucket


Delicately Constructed Friday

Boogieboard Cottage

July 22, 2011

Smoked Sausage Frittata

Ever made a fritatta? Have you ever had one? A frittata is basically a quiche without the crust. I don't often have ready-made pie crusts available and I certainly love anything that allows me to skip a step in dinner prep on a weeknight, so a frittata definitely works for me. They're great because they're totally customizable to fit your family's likes/dislikes and they can be VERY cost effective! Eggs are pretty much the cheapest type of protein, so they are a great option for filling, meatless meal.  However...

I love smoked sausage, and can usually get the healthier turkey option for super cheap by combining store sales and coupons.  I almost always have turkey smoked sausage in the fridge for things like jambalaya, smoked sausage and corn bisque and THIS frittata.  It's yummy and easy, I can add various veggies that need to be used up (like mushrooms or broccoli), and leftovers can be eaten for breakfast, lunch, or dinner! Thanks to whoever Colette is for the original recipe! I've given what I use and what I do below (the bell pepper is a MUST that I discovered on my own). I make this often. Hope you like it!

Smoked Sausage Frittata
  • 1 1/2 cups of smoked sausage, sliced (when I make this I use half of a package and dice it rather than slice it.  It makes the finished fritatta easier to cut)
  • 1/4 cup diced onion (I use half of a small onion)
  • 1/4 cup diced green bell pepper (eyeball it; use however much you want)
  • 6 eggs
  • 1/2 cup milk
  • 1/4 cup sour cream
  • salt, pepper, and garlic powder to taste
  • 1 1/2 cups cheese (amount is up to you. I don't measure this)
1. Preheat oven to 400.

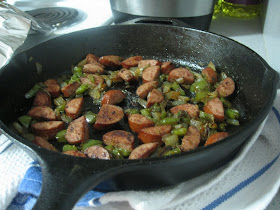
2. Cook sausage, onion, and peppers in an oven-proof skillet over medium heat until meat is browned and veggies are browned and soft. I use and recommend using a cast iron skillet and a just a little olive oil.  While mine is cooking,  I add some salt, pepper, and garlic powder.  Once done, you can drain off grease if you have any.  I use turkey sausage and never have a problem with this.

Ingredients before cooking


All browned up and yummy


3. In a bowl whisk together the eggs, milk, sour cream, and a little salt and pepper.

4. Top your meat and veggies with some cheese (around 1 cup).


5. Pour egg mixture into skillet.  Don't stir.  Bake for about 18 minutes or until a knife inserted comes out clean.

Random lumps of sour cream won't hurt anything. 


6.  Remove skillet from oven and top with a little more cheese. Throw it back in the oven until cheese it melted (just a couple of minutes).


Cut into wedges (make about 6 servings) and enjoy! This time around I served it with some rice that I doctored up with herbs, french cut green beans and toasted almond slivers and some fresh squash that I steamed.  (We also finished off the last of the carrot souffle, so our meal had a grand total of five veggies! We should win some kind of health award...)


This reheats well, so no worries.  If you make this recipe, come back and let me know what you think!

Join  us Saturdays at tatertotsandjello.com for the weekend wrap 
 up           party!

Strut Your Stuff Saturday

Tasty Tuesday Parade of Foods

Cast Party Wednesday

Delicately Constructed Friday


July 19, 2011

The next cooking challenge...

If your family is like most out there, you're eating a lot of chicken.  I hear people all the time talk about how bored they are with the chicken recipes they have used over and over and over. Although I can understand where you're coming from, since Adam and I watched "Food, Inc" last year, I have a REALLY hard time buying chicken at the grocery store unless it's organic.  Organic meat is a lot of wonderful things, but it ain't cheap, therefore I just don't buy it a lot! However, when I do buy chicken, I also can fall into a routine of using some of the same recipes over and over. Adam would eat chicken alfredo every day for dinner if I'd cook it.  And well, I just won't :)

Which leads me to our next chance to give me a cooking challenge and this time we're focusing on taking boring chicken and making it DELICIOUS! You know the routine. Look over these recipes from Allrecipes and let me know what you'd like to see me make. All four recipes involve a technique or ingredient I've never used with chicken before and I'm excited to see what you choose!

1. Artichoke Chicken
I've never cooked with artichokes, and really haven't eaten a whole lot of them.  I will be looking into ways to cut back on the mayo that the recipe calls for.  Looks like some people replaced some of the mayo with sour cream.

2. Chicken-Asparagus Roll-Ups
I love me some asparagus, so I think I'll enjoy this one. I'm interested to see if we like the flavor of tarragon in this recipe.

3. Crispy Coconut Chicken Fingers
I could eat my weight in coconut shrimp, so I'm wondering if I'll like this just as much.  The dipping sauce sounds interesting, too! I think it will be fun to add a little sweetness to dinner.

4. Honey Chicken Stir-Fry
I have sort of selfish reasons for including this one.  I've never made any type of stir-fry (I know, I know...) but a couple months ago I bought a bag of frozen stir-fry veggies in order to encourage me to try it! Let's get those veggies out of the freezer, shall we? haha

Leave me a comment below and let me know what sounds good to you! You have until Friday July 22nd 5:00pm Eastern Time to get your vote in. And just to make things interesting (and to entice you to actually leave a comment), one of you lucky commenters will be drawn at random to receive a free one-year subscription to Better Homes and Gardens! That's right, a giveaway! Be sure to include your email address in your comment so I can contact you if you win.


On a side note, anybody ever come across Belly Flops?? They're irregular Jelly Bellies! I found them at my local Dollar Tree :)

July 16, 2011

Cooking Challenge: Carrot Souffle

When you hear the word "souffle", what comes to mind? Probably not carrots.  I had a really good feeling that I would like this recipe and Adam would be confused by it.  The whole "sweet side dish with dinner" thing throws him off.  Should have seen the first time I baked a sweet potato...

However, if YOU dig mixing sweet with savory then this is totally up your alley.  Here's what you'll need (the amounts are what I used, click the link for the original recipe):

Carrot Souffle
  • two pounds of carrots, chopped
  • 1/2 cup melted butter
  • 1/2 cup white sugar
  • 3 tablespoons all-purpose flour
  • 1 teaspoon baking powder
  • 1 teaspoon vanilla extract
  • 2 eggs, beaten
  • 1 teaspoon powdered sugar (for dusting)
1. Start by bringing a large pot of salted water to a boil.  Add your chopped carrots and boil until tender.  This probably took about 25 minutes or so for me.

2. When your carrots are tender, you need to mash them up.  Some reviewers on Allrecipes suggested doing this in a blender, but mine was in the dishwasher and I was too lazy to wash it by hand.  I used my potato masher and made sure there were no big lumps left...this took a while.  And while I was doing it I added a better potato masher to my mental shopping list. I actually cooked and mashed my potatoes a couple days ahead of time and then just threw them in the fridge until I needed them.


3. To the carrots add: melted butter, sugar, flour, baking powder, vanilla, and eggs.  Mix well.

4. Pour into a two-quart casserole dish and sprinkle with powdered sugar.

5. Bake for 45 minutes (the recipe calls for 30 minutes, but I wanted the top to brown a little).

After baking. Yeah, the powdered sugar kind of disappears.  Sort of useless.

I was thinking that this dish was very Thanksgiving-ish so I went with it.  Instead of roasting a turkey, I roasted a chicken.  In the crock pot!


I also made a boxed brown rice/bulgur mix seasoned with roasted garlic and olive oil.  To make it my own I added broccoli, pecans, and parmesan cheese. I like some sort of bread/roll with my dinner (I'm a woman.  I like my carbs), so I heated up some whole wheat drop biscuits I had made a while back and threw in the freezer.  This was a mistake as the biscuits tasted like the freezer.  haha.  Not sure what went wrong there.  Nonetheless, here's Adam's plate:


And HERE's a certain kitty checking out Adam's plate:


The Verdict: We both liked the carrot souffle a lot. I had two servings! I think next time (and there WILL be a next time!) I'll add a little cinnamon.  Adam said it taste a lot like sweet potatoes, and it really does.  I think you could definitely add in some carrots the next time you make sweet potato casserole.

Thanks for the new recipe, friends! Stay tuned for the next challenge! We'll be tackling an ingredient that we all know and love... chicken!


Tasty Tuesday Parade of Foods

Cast Part Wednesday

Visit thecsiproject.com

Delicately Constructed Friday


CSI Project: Orange Challenge