Pages

September 30, 2011

Hummus Pizza

Whenever I try out a recipe for the first time, I generally tell the hubs beforehand "this is a new one, if you hate it I don't have to make it ever again, but we have to at least try it!". This generally isn't a problem because we're not too picky, but I like to give myself room to try out a recipe and it be a total flop. haha. When I made this pizza for the first time I was almost positive that he wouldn't like it...and I was wrong! Thanks again, Allrecipes!

This pizza has become a very common dinner in our house because it is so easy to throw together, its a great change of pace from typical pizza with red sauce, and there's lot of room for improvisation- I can use whatever veggies I have on hand and I can go with all veggies or just add some cooked chicken (great way to use up some leftovers!). Either way, its so tasty. If you love hummus, please give it a try and let me know what you think! The hummus sort of seeps into the crust and makes it soft and yummy. Oh, and you don't have to make your crust into a heart, unless you really, really like the people you're making it for :)


Hummus Pizza
  • 10 oz. can refrigerated pizza crust dough (or make your own! I wouldn't use the pre-baked crust because the hummus won't be able to bake into the dough like I mentioned earlier)
  • 1 cup hummus spread (I generally don't use this much)
  • veggies (I generally use things like broccoli, black olives, and mushrooms)
  • 2 cups shredded Monterrey Jack cheese
1. Heat your oven to 475.

2. Spread crust out onto your pizza stone or baking sheet. Spread however much hummus you want on top. I typically will use a little less than half of a container. Top with veggies (and/or cooked chicken) and cheese.

3. Bake for 10-15 minutes. Crust should be lightly browned and cheese irresistibly bubbly. I generally serve mine with a salad for veggie overload!

Are you a hummus lover? If so, give me some new ideas on how to use it!

Linking up:
Frugal Friday

Tasty Tuesday Parade of Foods


Cast Party Wednesday


September 23, 2011

Pom Pom Wreath

This is one of the projects that I swore I would never do again (because of the time it takes and the fluffy mess it makes... and the occassional blister on my hand), but because its so darn cute I can't help myself! I've become slightly obessed with wreaths, and one of the first wreaths I ever made was this one using pom-poms that has been on my front door for months now. (Don't worry, I have plans to update for the fall!) It looks so cute on our door, and matches the color scheme I'm using for the front porch so well. I really need to get a picture of the whole porch so you can see our "newish" furniture, pillows, and rug!

Do you love that little owl on the steps as much as I do? You probably can't love it as much as I do...


A closer look. It's so retro-y and fun! And poofy!


Please understand that this is not a project you're going to finish one afternoon, but if you can work on it a little at a time I promise it's worth it! And it's time consuming but really easy. I even worked on some of the pom poms during my lunch break at work a couple of times. Interested in making one of your own? Here goes!

Supplies:
yarn (use one color or multipe colors, I just would recommend using at least three)
wreath form
scissors
patience

1. Cut a piece of yarn.... I don't know how long it is exactly but I usually did it the length of one of our toss pillows on the couch. This doesn't have to be exact, so let's say ten inches or so. Lay this piece of yarn on a flat surface.

2. Wrap yard around your hand. I wrapped it around my hand 50-60 times. You could do this same wrapping process on something smaller or bigger than your hand depending on the size pom poms you want. Cut after making your desired number of loops


3. Lay your hand on top of the cut piece of yarn and slide the looped yarn off of your hand. The loops should be at the center of the cut piece of yarn. Here I'm just doing the same thing on my white, freckly, "I promise I'm wearing shorts!" legs :)


4. Wrap the cut piece of yarn around the loops and tie a knot.


5. Using your scissors, cut all the loops, leaving you with a crazy-looking stringy creature.


6.  Trim the pom pom until it's as small as you want. This picture shows a pom pom before and after.


7. Begin attaching the pom poms to your wreath. Whenever I use these straw wreaths, I leave the plastic on to avoid getting straw everywhere.  This is what the back will look like.  I recommend leaving the back pom-pom free so it will lay flat on your door/wall. If you look closely you'll see the price tag still attached...from Goodwill! Believe it or not I even get a lot of my craft supplies from Goodwill. The wreath and two of the shades of yarn for this wreath were bought at Goodwill. Score!


Here's my finished wreath! Because I bought partially-used portions of yarn from Goodwill, I ran out of the two pinkish colors first, so that's why there's more black, but I don't think it looks bad. It's so much cuter in person, but I understand that it's not everybody's style. 


And here it is in its new home, my office door at work:


What do you think? Do you love it or would you leave it? Because of the fluffy-soft texture of this kind of wreath, I think it would be adorable in a nursery. Can't you picture it in baby blues and white?


The DIY Show Off


Photobucket

September 22, 2011

Pizzadillas!


Just a friendly reminder that if you're craving that bad-for-you, cheesy, pizza goodness you don't have to call Papa, Domino's, or The Hut! We do a lot of quesadillas at our house (mostly chicken), so I try to keep whole wheat tortillas in the fridge.  Add some cheese and some of your favorite pizza toppings to tortillas and then cook in skillet, oven, or quesadilla maker and BOOM! Pizzadillas!

You can see in the picture above that I added pizza sauce in the quesadilla, but next time I will just heat it up a bit and serve on the side as a dip. It wasn't bad in the quesadilla, just made them messy and floppy (wouldn't firm up...hard to eat!). I think kids would love these! Serve with a salad and you've got a super quick lunch or dinner...or snack!


Photobucket


Cast Party Wednesday

September 19, 2011

Weekend fun and Dana vs. Godzilla

Ready for a super sized blog post?

My birthday is tomorrow and as my gift Adam planned a top-secret surprise weekend getaway for us. We ended up in downtown Atlanta at the Hyatt Regency on Peachtree Street. When I saw that it was valet parking only I decided that it may have cost a little too much, but Adam knows me so well and knows that my love language is BARGAINS and was able to score an amazing deal on the hotel using Travelocity's Top Secret Hotels. This is the only way we book hotels now, and we've never been let down. Basically we got a four-start hotel at a two-star price.  Way to go honey!


We lived it up and ordered room service when we got there on Friday night. Adam's burger was delicious and the shrimp tempura was the best I've ever had!


We spent Saturday (sleeping in a little) shopping and eating at Ikea, saw a movie at one of those swanky theaters that serve meals and drinks (helloooo pomegranate martini!), and more shopping and eating. Mostly we just enjoyed our time together! And I got to wear a new dress :)


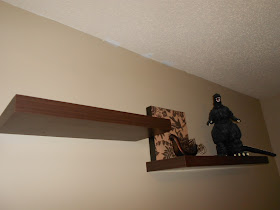
So now that you're jealous of my awesome, thoughtful husband, I can get back to our real life which doesn't involve room service or valet parking. A few weeks ago we started our bedroom transformation, and the paint and moving around of furniture was enough to make it SO much nicer in there.  We installed floating shelves but I hadn't really gotten around to decorating with them, so Adam took it upon himself to make a design decision...


That's right. Godzilla's in my bedroom. 


It goes without saying that I had to make some changes. And I didn't want to spend money. So I went shopping in my home and got a little crafty using stuff I already had on hand. Like these books...


As much as I appreciate a good psychology book from the 70's, I knew I could jazz it up a little bit.  I took pictures of this process but it's kind of a no-brainer.  Basically I used some cute wrapping paper I got at the Dollar Tree months ago to make covers for the four books.  No need for perfection here, we're just going for the look of a cool collection of books...without the collection :) I tried standing them up together, but liked the more relaxed look of the stack.


I moved stuff around on those shelves for what seems like forever, and still am not sure that I'm sold on the finished product, but I'll keep my eyes peeled for things around the house I can use or items from my favorite thrift stores.  Here's what the shelves look like as of right now. I think you'll agree that while Godzilla was an interesting touch, this may work better in our grown-up, beautiful bedroom. And just so you know (as if you haven't guess already) the metal birdie, cream frame, cross, bookends, and books all came from a thrift store.  I used the same wrapping paper from the books in the cream frame to bring the two shelves together.


Let me know what you think! Ever thought about using some old books to decorate with?

Linking up:


Join  us Saturdays at tatertotsandjello.com for the weekend wrap 
 up           party!


Photobucket


The DIY Show Off


September 13, 2011

Half off at Whole Foods!

Wahoo! Check out Living Social today for $20 worth of goodies from Whole Market for $10. I have a Whole Foods store (Greenlife) near my office, and I love running over there to grab lunch, snacks for my desk, or produce for meals at home.  I've also found that their organic milk is much cheaper than at my grocery store, so its my new stop for milk! They have a great selection of vitamins, herbs, and supplements and I've recently started taking a Whole Foods brand food-based multivitamin designed for women.

I encourage you to grab this deal today if you have a Whole Foods near you. Eating organically can be pricey (but TOTALLY worth it) so I jump on any chance I can to save some money on good-for-me products!

September 11, 2011

How I do meal planning

I've been a little MIA on the blog for a bit, and I blame some complications with a root canal I had several weeks ago.  Up until a couple days ago I didn't feel like my usual self and was having severe pain in my jaw and pretty much constant headaches.  Pain killers made me sick and all problems combined resulted in lack of sleep...and lack of energy to do anything. However, I'm back in the game and grateful to be feeling better!

I have people ask me occassionally how I do my meal planning and thought I would give you guys an example of what I do most weeks. Now, keep in mind it's just the two of us so our quantities may be smaller, but the same principles apply to larger families. Meal planning for me goes something like this:


1. Anyone who knows me knows I coupon! You're going to get your best deals by combining the sales for the week with coupons. As a good rule of thumb, keep in mind that the products on the front and back page of your sales ad are the best deals for the week most of the time.  Also, a lot of couponers and frugal moms will tell you to buy whatever meat is 99 cents per pound or less for the week. 

So, long story short: base your meals on what's ON SALE. The store dictates your menu, NOT your kids :)

2. I consider what I already have in my kitchen.  I look for things that are about to expire and use them up so they don't go to waste! This is especially true for those of you who stockpile items through couponing. 

3. Combine what you bought and what you already have and plan your meals! I most often use allrecipes because their ingredient search makes it easy to find a recipe that uses the specific ingredients you're trying to work with. Most weeks I try to do one crockpot meal and at least one meat-free dinner.

4. I type up my menu for the week, including main dish and side items (and dessert if I am so inclined). This menu along with the individual recipes get printed up and posted on the fridge so hubby knows what to expect for dinner (I will eventually begin training him on how he can look at the pages and figure out how to help :) )

5. This is the super important, super helpful part.  I look at each night's dinner plan and decide if there's anything I can do ahead of time to make that night's work easier.  For example, I will often go ahead and cut the week's worth of onions/peppers on Sunday, brown up ground beef for spaghetti later in the week, etc. I will make notes for each night on what I'm cooking, and what prep work I need to do for later.  This includes putting frozen meat in the fridge to thaw. How many times have you forgotten to thaw out some chicken for dinner and ended up getting pizza? Been there, done that.  All prep work is marked with a "*"

That being said, here's my plan for this week.  This week's a little different because I don't have to cook for three nights. Tuesday nights are when Adam goes to class so sometimes I will go ahead and cook so we have leftovers for lunch the next day, but this week I know we will still have lots of the chicken soup left, so I will just be doing prep work. Friday and Saturday night I'm off the hook because Adam has planned a surprise trip to who-knows-where for my birthday! Very excited, but until then, here's what I have in store:

Sunday
Chicken and tortellini soup
garlic bread (using french bread from freezer)
*cut onion and pepers for frittata
*thaw salmon
*boil eggs for breakfast

Monday
Dijon Salmon
baked potatoes
corn
*thaw white beans
*thaw 2 cups chicken stock
*thaw chicken breasts

Tuesday
*cook and shred chicken breasts

Wednesday
Southwestern Chicken and white bean soup (put in crock pot in the morning)
Cheese quesadillas

Thursday
Turkey smoked sausage frittata
quinoa
green beans

Friday
Off the hook- birthday trip!

Saturday
Off the hook- birthday trip!


And that's how it's done! Trust me, planning ahead like this will totally relieve some of that stress that comes along with figuring out a way to get dinner on the table every night. If anyone is interested in seeing menu plans more often to see how I plan ahead, just let me know and I can do this more often.  I'll at least try posting a week's plan where I have to cook every night, because that's more typical.