November 24, 2012

Long time no blog...

Since you've heard from me last...


I've had another birthday complete with flowers from hubby.


I've ran in my very first 5k.


I've successfully grown adorable and quirky carrots.


I baked approximately a zillion cupcakes to raise money for the Komen foundation.


I had my college roommates and their families here at our house for a whole weekend. All three were pregnant at the time!


Adam and I performed the closing waltz at our very first ballroom dancing expo.


And I threw Adam a totally awesome 80's birthday.


Life is great and busy. At some point I hope to sit down for 5 minutes and actually work on the ol' blog again. 

Maybe in 2013??


August 28, 2012

It's the little things...


... that bring the biggest smile to my face!

So, I know this isn't a new idea, but it's a first for me and I thought I would remind everyone how fun this simple update can be! 

I was perusing Marshalls the other day after picking up some new shirts for Adam when I spotted the cutest shelf lining paper in the home section. They had lots of great colors and fun patterns. My original idea was to use a pretty aqua quatrefoil pattern to add a little pop to the back of our bookcase in the den. When I got home I realized this was a "no go" because our books pretty much cover the back of the bookcase.

Plan B!

Here's my drawer in the master bathroom before the quick purging and update:


And here's after!


Cute, huh?
 
I only did the two upper drawers so far, and I'm not even sure Adam has noticed the change that has taken place under his deodorant and toothpaste :)  I have TONS of the lining left, so I'm excited to add it to my crafting supplies. 
 

August 19, 2012

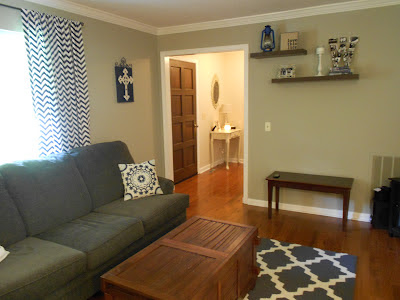
House Before and After: Living Room

There's nothing more relaxing than a rainy Sunday afternoon, so I'm soaking up the R&R before another busy week gets started. I realized that I haven't done a before and after post from the house in a while, so it's the perfect time to share our living room.

This is the room we spend most of our time in. The room where we argue about what to watch on TV. The room where I look like a cat lady, curled up with a blanket, a book, and two furballs in my lap. And as much as I hate to admit it, it's where we eat a lot of our meals. Ugh.

I unfortunately don't have a lot of great "before" pictures in this room, but this one will at least show the awful red and gross carpet we were dealing with...

You're seeing the opening to the dining room, which we expanded.


Here's a shot from the living room looking into the entry way.


Not much to say about the transformation, so let's get straight to the pictures! Just be prepared for switching back and forth between pictures taken two weeks apart so things changed during that time!


The huge mirror is one of two that Adam's dad made for us a few years ago.


This ladder was my big purchase during the world's longest yard sale! The chalkboard signs were purchased on decorsteals.com


The floating shelves got changed up a bit...


All of my pillows came from different sellers on etsy...


And last but certainly not least, one of my favorite things about this living room is that I made cat beds out of antique fruit and wine crates...and they actually use them!!


 There's not a lot that is left to be done in this room other than filling up some blank spaces on a wall of two.


August 2, 2012

Two Saturdays of Thrift

Yeah, so these posts are kind of way "after the fact".

Oops.

Anywhoo... A couple of weeks ago I joined up with Rhoda from Southern Hospitality along with other thrifty gals for I Love Thrifting Day! I definitely drove the farthest to participate, but as I explained to the ladies there, my husband is a DRUMMER, so any chance I get to escape our NOISY house, I take it! haha

I was a slacker and didn't take any pictures so I'm "borrowing" Rhoda's. Hopefully since I'm giving her credit she'll still be my friend :)


Here's the group meeting up for breakfast at Great Harvest, where I had a coffee cake muffin that changed my life. You can spot me by the window on the left.


Here is the majority of the ladies at our first stop. I'm over there on the end with Rhoda. I wish you could have seen how confused employees and other shoppers were when this big group showed up at all of the stores. haha. We had a lot of explaining to do!


Here I am with a few of the girls checking out at the first Goodwill.


So I didn't walk away with any majorly exciting scores, but I did get a TON of books for twenty cents each and some picture frames for my ever-evolving gallery of pictures in the stairway. I also got...


A really cute lantern (with candle) in the prettiest shade of green. This is hanging out in our half bath right now but will be great to use outside when we hang out with friends on the back deck.


Continuing with the lantern theme, I snatched this one up at the antique store we visited. When I got home I flipped it over and found out it was originally from Pottery Barn. It's on the coffee table in the den for now.


I'm always on the lookout for holiday items to add to my collection, and this cute snowman spoon rest had to be mine! (Can someone please tell me how people pay high retail prices for holiday decor?)


The next weekend I met up with my super fun and awesome friend, Emily, to hang out before she leaves the country for a year to teach English in Korea. We decided to meet up at a halfway point, and we lucked out that our halfway point is the home of the Unclaimed Baggage Store! I had always wanted to go, but never knew it was so close to Chattanooga! I might need to admit the one of the highlights was seeing one of the puppets from my favorite movie as a child, Labyrinth... :)


I'll just throw this out there... I don't think anyone is going to find any uh-mazing deals here. It's more about the experience and the chance to imagine why in the heck someone left these things on a plane or didn't worry about tracking it down when their baggage was misplaced. I think you might find deals on designer clothing and accessories, but even that "deal" of a price is higher than I would pay for something. That being said, I did find two really cute brand new (tags still on them!) dresses.


This one is from Loft (Ann Taylor) and the original price was $79.99. I paid about $20. I recently wore this out on date night at The Melting Pot :)


This one is from a brand/store I've never heard of, but I love it! It makes my waist look tiny (or as tiny as my waist can look).


I also picked up metal wall hanging that will go in the master bedroom, so you'll see that soon enough.

And speaking of the master bedroom,  Adam and I finally went to one of those super fun painting classes and made these for that room:


We had a great time and I love how they came out! I think we may put them above the headboard.

July 9, 2012

I love getting mail...

As long as it's not a bill.


Anyway...


Remember how I recently participated in C.R.A.F.T's Package Pals? I never got a chance to share the cool things I got from my pal last time because they got spread around the house before I took pictures. Oops. But this time I was a good blogger and took pictures!

I was so lucky to get hooked up with the sweetest pal this time around, Kristy from Cup of Jo. You've got to go check out her blog. She's super creative and just plain funny! We shared some info and laughs via email during the month of June and then, Oh happy day, I got an amazing package of goodies!


Kristy knew my living room was gray and navy blue, and the chevron matches my curtains. LOVE these!


DIY mugs! She included directions on how I can make my own, but my handwriting is much, much, much worse than hers. And I can't draw worth a flip... but I love the idea! haha


How cute are these? Kristy and I agree that when it comes to wine, Moscoto is the way to go! These wine markers can come in handy for a party or wine tasting with friends.


These handmade coasters are awesome! I really like the kind of tile she used, and she even put little rubber thingamabobs on the bottoms so they wouldn't scratch the furniture. So smart, that Kristy!


This necklace is adorable, and I love that I can flip it over for some gray chevron action!


Kristy made these vases out of frap bottles! I had mentioned that our master bedroom has a lot of robin's egg blue and that I was considering adding some pops of yellow. Here's a start!


So yeah, she totally spoiled me and I hope she enjoyed the package I sent to her half as much as I loved hers! Again, I'm a bad blogger and forgot to take pictures until the box was all taped up, so I will "borrow" some from her when she shares her package on her blog.

Thanks again, Kristy!! You da best!


June 24, 2012

Leftover Chicken? Make these!


I pulled out this recipe last night after realizing I had almost a full rotisserie chicken in the fridge that I needed to use. I had used some of the meat for chicken and black bean quesadillas a few nights ago and wanted to use up the rest of the meat so I could get the bones into a pot with veggies and herbs to make some more of my homemade chicken stock.

These are called chicken croquettes, and they're great not only because they are a unique way to use up any kind of leftover chicken you have (I've used leftover baked, roasted, and grilled meat) but also because they are so customizable depending on whatever you want/need to use up. Last night, for example, I had a couple roasted red peppers floating around at the bottom of a bottle in the fridge, so I knew those would work. My roasted chicken yielded about 5 cups of meat, so I also increased all the other ingredients to make 12 croquettes. I'll give you the starting recipe and then some things I do to jazz it up a bit.


Chicken Croquettes
Original recipe found HERE

  • 3 cups cooked and finely chopped chicken (dark or white meat, doesn't mater; you're going to want to really chop it up pretty finely so the patties hold together better. I used my Pampered Chef handheld chopper)
  • 1 1/2 cups seasoned bread crumbs
  • 2 eggs, beaten
  • 2 cups sauteed chopped onion
  • 1 tablespoon chopped fresh parsley
  • 1 tsp salt
  • 1/2 teaspoon ground pepper
1. Saute the onions in either olive oil or butter. I wouldn't skip the onions in this recipe because they help keep the croquettes moist and add a lot of flavor. Mine were vidalia so they were yummy and sweet.

2. Now this what I do to make sure my croquettes taste good even before I cook them. I mix all ingredients but the eggs together in a big bowl, and then I get creative! I usually add some parmesan cheese, herbs (either fresh or dry, doesn't matter!), Lawry's seasoning salt, garlic, etc. Like I said, last night I threw in some finely chopped roasted red peppers. I sample the mixture and add ingredients until I like the way it tastes, then I add the eggs.

3. Add the two eggs to the mixture. If the mixture is too dry to form into patties, add another egg.

4. You have two options for cooking these. You can cook them in a skillet in some oil over medium heat until golden brown, or do what I usually do and bake on a lightly greased cookie sheet for about 12-15 minutes at 350. I've done both cooking methods and the work just fine, I just like throwing them in the oven because it's less fattening and it gives me a few minutes to work on something else in the kitchen.


These are great with just about any sides, and the website I found the recipe has reviews from others that like to use them for sandwiches. I served mine with some broccoli salad and some cheesy herb baked potatoes. These are man-approved in my house, and I hope your family enjoys them, too!


June 7, 2012

Not perfect, but pretty!

I still haven't taken the time to share pictures of the living room, and that's partially because I don't feel like it's "done". The living room has a gray, white, brown, and navy blue color scheme, and right now it's just TOO gray. I'm kicking myself for not going with the navy rug...

Anyway! On a recent trip to Goodwill I found this metal wall art and thought it was pretty cute, and the $3.00 price tag made it a lot cuter! The price tag from Hobby Lobby was still on the back, and I'm hoping that the art's original owner didn't pay $25 for it. Yikes. There was a random yellow line of paint on the right side and there were a couple of dinged up spots, but I knew I could take care of that!

 The background of this picture makes me laugh because it shows the "his and hers" aspect of our garage. A pallet for me on the left, and hubby's weights on the right!


I decided that this project was my chance to start bringing more blue to the living room.
First I rubbed the whole thing down with a little sandpaper and sprayed it down with white paint and primer. Next, I covered the cross with aluminum foil and sprayed the rest blue, the same paint I used on my yard sale lamp. I'm sure there's a better way to do this type of "sectioning off", but I'm kind of impatient and it's the first idea I had :)


The aluminum foil method wasn't the greatest... there are a couple of spots where the paint went under the edge of the foil, but oh well! I channeled my inner nester and remembered that it doesn't have to be perfect to be beautiful!

AND it serves its purpose, if only temporarily. I finally have something on the living room walls and there's more blue... which makes me happy :)


And before I go, I wanted to share with you the most creative housewarming gift we got last month. Our sweet friend Cristina has been our go-to-gal for her photography skills, and we've had engagement, anniversary, and Christmas pictures done by her (and love them!). Cristina used her arsenal of pictures to make us this SO COOL gift...


A closer look:


Isn't that a great gift idea?
Thanks, Cristina!!!