April 14, 2012

House Before and After: My favorite room, the kitchen!

This is where I wish I could magically produce pictures of the kitchen in our last house. You just can't even begin to understand how much I appreciate this new space after cooking so many meals in a kitchen the size of some people's closets. Our last kitchen was a galley kitchen, and had very little cabinet and drawer space. I bought a shelving system to use as microwave cart/storage area, and that helped some, but the cabinets were overflowing and I had to store stuff above the cabinets as well. I even had some serving pieces and things I used less often (fondue pot, punch bowl, etc) in containers out in the garage.

It was bad.

But I was thankful for the roof over my head. And for the working appliances :)

And then came this beauty...


Yikes!


A little closer look...


I'm assuming the cabinets were original to the house (built in the late 70's). I'm not sure if you can tell, but the counter tops were TILED! That brown door you see in the left in the first picture is to the pantry, which I talked about here. Also in the first picture, if you can see the partial wall (with chair railing) that broke up the kitchen and the dining room.

Here's the other side of the kitchen, where the fridge was:


I've said it before and I'll say it again. This whole experience was amazing because I literally got to pick every single thing that went into this kitchen. So everything you're about to see was stuff that I fell in love with! The cabinets and hardwood floors came from Southeastern Salvage, the cabinets and hardware came from a local company that I can't for the life of my remember their name, and the backsplash tile is from Mountain City Tile. Appliances, sink, and faucet are from Lowe's.


Now let's get to the reveal!!! We had the partial walls separating the kitchen and dining room taken down, which opened up the space and extended the area so we could have some more cabinets and counter top space. Bonus!


I stinkin love our sink, because it is so deep. You can't tell, but I definitely had a dirty pan in the sink while taking these pictures :)


Tired of the all the pictures yet?


Close up of the backsplash:


On to the other side!


Got a great deal on the fridge because there was a dent on the side. You know, the part you can't see!


I went with pulls on drawers, and knobs on cabinets. I'm not sure if this was what normal people do, but I think it loos good. I guess that's what counts!


Call me old-fashioned, but I just don't care for the smooth surface stove tops, but the generally don't have coil tops in stainless steel. So I had to special order one! Thanks, Lowes!


One last thing, and I'll let you go on your merry way. We have a nifty little "gadget" that we keep on our dishwasher that we change to show if the dishes inside are clean or dirty. Very handy! You can find them on etsy.


So there ya have it! By no means the fanciest or most amazing kitchen, but I love it and appreciate the space so much. It's a dream cooking in here with so much counter top space. We definitely have room for a small island, which we may consider adding in the future, but for now I love being able to move around and not feel cramped.

Hope everyone has a great weekend!


April 10, 2012

Oregano Chicken... for when you want to be fancy shmancy!


Winner winner! This is an uh-mazing chicken dinner!

I consider this meal a major accomplishment because

1. I cut up a whole, raw chicken for the very first time (thanks youtube!)
2. I used fresh oregano that I grew myself on our deck
3. I got the "hungry man seal of approval" from my husband and one of his friends. I think the exact words were "this is better than 'not bad'". haha

I'm thinking this is for sure something I will make for guests, because it looks fancy but is so easy! And it's not labor-intensive at all. Once you brown the chicken, you get to throw it in the oven for 45 minutes and get some other things around the house done (or prepare the rest of your meal).

I didn't get an official "finished" picture, but you'll get the gist. I served mine with orzo and some steamed broccoli, but I think next time I'm going to have to make mashed potatoes. It just seems natural...

You can check out the blog where I found the recipe HERE. She is a great writer and all of her food looks delicious.


Oregano Chicken
Recipe from this site

  • Mix of bone-in chicken pieces (I used a whole chicken that I cut up, so I had two wings, two thighs, two legs, and four breast sections)
  • salt
  • black pepper
  • 3/4 cup flour
  • olive oil (enough to brown chicken)
  • 1 cup dry white wine (I used 1.5 cups because I was using up the last of a bottle)
  • 4 springs of oregano, leave removed from stems and stems discarded (I used Greek oregano from my herb "garden". It's different from what she used, but it worked out just fine!)
  • 3 bay leaves
  • juice from 1/2 lemon
  • 1 1/2 cups of water

1. Preheat oven to 425.

2. Season chicken pieces with salt and pepper. Dredge chicken in flour (covering completely) and shake off excess.

3. Heat olive oil in a pan over medium heat. This needs to be a pan that you can put in your oven. I used my cast iron dutch oven. Gosh I love that thing...

4. Put your chicken in the pan, skin side down, and brown for five minutes or so, until just the outside gets nice and brown. Flip pieces to other side and cook for another five minutes. I did half of the chicken first, and then set that meat aside on my pretty little lemon cutting board while I browned the other half of the meat.


5. Being very careful, slowly pour in the white wine. Add oregano and bay leaves. Allow liquid to reduce for about two minutes, then add water. Put the lid on your pot and put it in the oven for 45 minutes.


6. After 45 minutes, take off the lid and give the pot another 5 minutes or so in the oven.

7. Remove chicken from the pot, place on a plate/platter, and "tent" with foil. Add lemon juice to the yummy liquid in the pot and remove the bay leaves.

Done! Pour the "au jus" into a bowl and let people ladle some of it over their chicken/rice/potatoes/pasta/ hand. Just kidding about the hand part. Sort of. It's delicious!

The chicken is so moist and the sauce is so flavorful. I imagine you could do this with whole bone-in chicken breasts if you wanted, you would probably just need to adjust the time in the oven. I want to make this again very soon!!


Cast Party Wednesday
Tasty Tuesday Parade of Foods
Tuesday Talent Show
Craft and Tell
Delicately Constructed Friday

April 6, 2012

House Before and After: Pantry!

It's funny how as you get older the things that make your heart go pitter patter change. I have no shame in admitting that the first time I toured the new house, the sight of the space under the stairs immediately made me super excited. Embarrassingly excited. An actual pantry!

Those of you who saw our last kitchen totally understand why I was thrilled. I had TWO cabinets and TWO shelves on a microwave cart to store canned goods, baking supplies, cereal... really anything that didn't need to be refrigerated. It was rough, but somehow I made it work. Having a pantry allows me to use all of my kitchen cabinets for non-food items, and that is amazing! It allows me to organize my supplies so much better.

Here's the space under the stairs before. You may not be able to tell, but it is quite deep. The two silver boxes are part of the air returns. I can only imagine what grossness was in here when the previous owners occupied this place. Ew.


The guys who were working on the house were going to close up the pantry in front of the air return thingies (boxes? cases? enclosures?), but I asked them not to. Why would I want to miss out on any possible storage space? I imagined that the very back area could be used for surplus storage (paper towels, pet food, etc.).

Here's the after!


So great, right??


Now, I didn't organize this space for this post and make it all pretty. This is real life, people. It is sort of organized anyway, just so I can find things easier. The back shelf is all baking supplies. Top shelf is canned goods and pasta. Second shelf is rice, dried beans, oils, and breakfast stuff. Third shelf is all of Adam's protein powders, "stockpiled" stuff, and kitchen towels. I have my bread machine, plastic shopping bags, and the world's largest box of milk bones on the floor. I haven't really utilized the space in the back on the floor yet, but I have plenty of things to fill it with :)


The baking shelf. Still loving my homemade vanilla (in the vodka bottle).

The other side. I will most likely use hooks to organize cleaning supplies here.


And finally, knowing that admitting you have a problem is the first step to recovery, I need to show you my stash... it's getting very, very bad...


I love Scentsy!!!

Everyone have a fabulous weekend! The weather here is gorgeous and I'm enjoying getting lots of stuff done around the house with the hubs.


April 4, 2012

Mixing patterns in home decor: Love it or hate it?

Today we're talking risks.

Skydiving.

Moving to a foreign country.

Opening up a cupcake store.


Ok, I'm not talking about those kinds of risks. Although, any of those sound pretty scary to me. But scary can be good sometimes, right?

I've been working on actually decorating the new place, and for the most part I've stuck with what I know. Colors, materials, patterns, or whatever that I've used and loved before. Of course whenever you move you take with you stuff that you used in your last place, and now you just have to figure out how to make it work in the new space. So stuff that used to be hanging in the old living room is now in the master bathroom, and the rug we used to love is now... being stored in the garage.

That's a bad example.

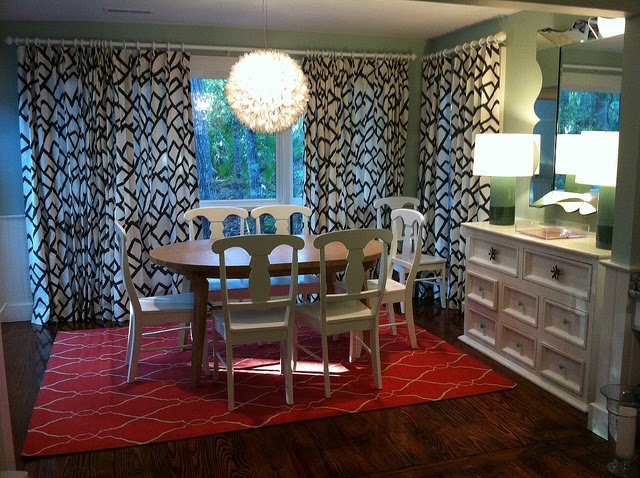
In planning the "design" for our living room, I decided on a gray, navy, brown, and white color scheme. It was fairly neutral and classic, masculine enough that my husband wouldn't feel like he lived in single woman's house, and it allowed me to use some pops of color if I ever felt like it. I had some really pretty navy and white chevron curtains custom made from a great seller on etsy, and during the four or five weeks of waiting for them to come in, I had to find a rug. I found one that made my heart go pitter patter on Rugs USA. If you're friends with me on facebook you might have seen a picture. It's called a trellis pattern, and I got it in charcoal and white.

So now I have curtains that I love, and a rug that I love, and they both have very bold, geometric patterns. The issue at hand is this:

Am I cool enough to mix patterns in my house?

Is it too busy...or is it fun and interesting?

Will my husband ever trust me with decorating the house again??


I have searched the interwebs for pictures of mixing patterns in home decor and tips on how to do it the right way. Here's some examples that made me feel braver:


At the end of the day, I sort of love it, even though it makes me nervous and my mother for sure hates it. I think it makes the space so interesting. I plan on keeping pillows and art very simple, so I don't believe it will be too "busy".

We're having our furniture delivered today so as soon as I get the room together I'll share pics and you can give me your verdict! Just please...be nice.

So... What do you think? Mixed patterns: love them or hate them?

March 20, 2012

House Before and After: Half Bath/Laundry Room

You're not going to believe this one! This transformation proves that we had top-notch people working on this house. Like... they may be magicians.

This half bath is the only bathroom downstairs, so it will be the one our visitors use most. It's a nice size, so it doesn't feel cramped or "powder room"-ish like some half-baths can feel. I personally don't love having my laundry area open in a bathroom, so I was really excited when I found out they could close it off. I mean, I never have baskets and baskets of clothes piled up in my laundry room with miscellaneous undergarments and dirty towels strewn about, but it's nice to know if I did it would be hidden.

Please don't ask me what the deal is with the paint in there. I'm telling ya... the previous owners were wackadoodle. Why in the world someone would paint their bathroom black and brown I have no idea. I also hear that when my in-laws first purchased the home that there was a section of the flooring between the "hall" and this bathroom that you could see the ground under the house. Not floor- ground. Dirt. Hole in floor. Bad news.

Here's a before shot, the view as you walked into the bathroom. I can't remember what flooring used to be here, but the in-laws were quick to rip it all up before they caught some kind of disease. :)


And here, my friends, is the GLORIOUS after!!! We used  the same color in here as we did in the entryway/stairs. It is Sandstone Cove from Behr. I actually really like it in this space. It feels so fresh and clean in there.


Curtains are from Target. They have some seriously great curtains now!


This next shot gives you a better look at the flooring. We went with a bit more pricey tile for this bathroom since it would be used more than the other bathrooms. It's so so pretty and I love it!


This next picture was from when we weren't officially moved in yet, but we were kind of between the two houses. I had to come over to the new house to do laundry! Please excuse the clothes hanging to dry, but it's kind of cool to see the washer and dryer in their little hideaway. Doesn't the window look sad without my pretty curtains??


So let's move on to the bathroom portion of the room, shall we? Here's the before shot:


BORING!!


Although from a different angle, here's what the space looks like now!


My father-in-law made that mirror! I love how the traditional frame mixes with the modern lines of the vanity and contemporary lighting. PS- I scored the vanity AND top for $99. No kidding!


And since you're nosy and can't stand an incomplete picture, here's what it looks like if you take a small step to the left. Toilet shot! (pre-mirror and pre-bathroom accessories)


I spend a lot of time in this room, since apparently Adam and I produce as much laundry as the Duggar Family, so I am thankful it's a pretty space. I'm looking forward to getting some things up on the walls to make it even more beautiful!


Linking up!

March 14, 2012

Thinking about Jonesy...

It's a sunny, beautiful day! (Or, at least that's what people are telling me. I'm stuck in my office in the middle of the building without windows. Bummer.) I was looking through the pictures on our camera and I found this and wanted to share.

It's the last picture we ever took of my sweet Jonesy... making it rain, obviously. What a good sport. haha. Adam had just sold a ton of stuff on Craigslist in preparation for our big move, and Jones was helping us celebrate the increased cash flow.


I don't want to be a blubbering fool, and you non-pet-people just won't get it, but I miss him so so much. Seriously the best cat ever, and one of the joys of my life. He was so sweet to come home to and snuggle with. And I have such great memories of just me and Jones in my teeny tiny apartment when I first moved to Chattanooga. I'm trying my very best to be a good "mom" to these new kitties and give them and myself time to form that same kind of attachment, but it really is quite an adjustment. I might be quicker to "attach" if they would stop leaving kitty prints on my brand. new. stove.

Anyway, Ringo and Miles are now a part of the family and we'll all learn to get along. :) It sure does help when they both jump up in my lap for a nap. Precious!


March 13, 2012

Spinach Brownies. Ya gotta trust me on this one...


I'm sure the name kinda freaked you out.

Sometime last year I ran across this recipe and the name weirded me out so much I had to check it out. I did, and I am SO GLAD I did! This is a savory recipe, not sweet. It's a great way to use either fresh or frozen spinach, and is a wonderful side for a lot of meals.

I used to make these in a 9x13 baking dish and then just slice them up into individual "brownies", but the problem was that between the two of us we could never eat them all before they started seeming "questionable" in the fridge. Fast forward to last week when I found a half-used bag of spinach in the freezer and thought I could make these, this time using my muffin pan. This was a stroke of genius because

1. Automatic individual portions
2. Each brownie would have crispy edges (which are delish)
3. I could freeze them and reheat individual brownies as we need them

Problem solved. These turned out so well in the muffin pan and they reheat great. The only thing I usually do different when I make them is add a little garlic powder. I try to stick with mostly mozzarella (or at least an Italian mix of cheeses), but I've also added some cheddar and it added a yummy sharpness. Just make sure that if you're using frozen spinach to squeeze out as much water as possible, because soggy spinach will make for soggy brownies. Ew.

Check out the recipe HERE and let me know what you think!!